Showing posts with label measurement. Show all posts

Monday, March 30, 2015

Number Line (a.k.a. Measuring Tool)

Math efficiency - what a never ending and massive goal to reach.  We chip away at it day by day, because moving drawers and tally makers to more efficient strategies is not an easy task.  When they start forgoing tallies for number lines, for example, it's a BIG deal and worthy of a shout out on Facebook.  (I've been known to do this on occasion.)  

For certain every year my mathematicians are grasping the number line better than the year before, which hands-down has something to do with the fact that I'm teaching it better.  It's amazing how that works.  

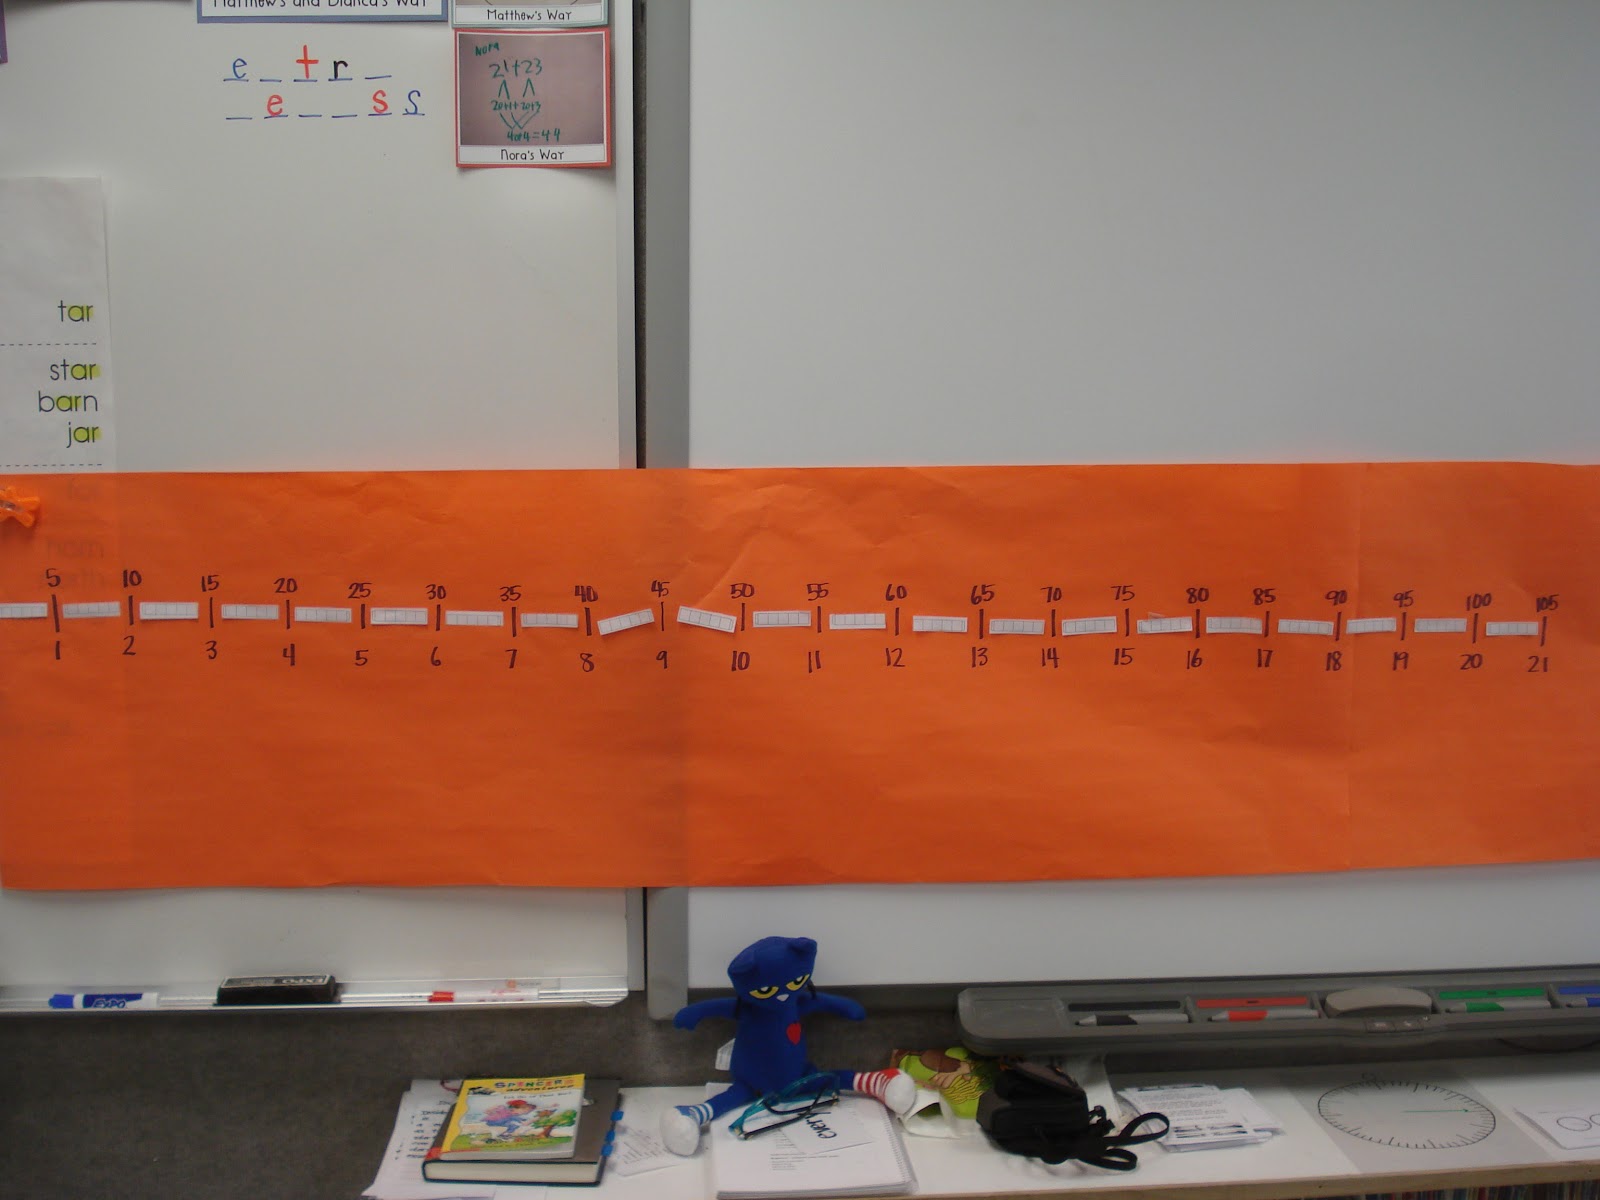
This year my number line Aha! moment came when I realized it's a model that's useful in various contexts, which of course leads to more meaningful connections.  Here are three ways my mathematicians are using the number line in our measurement unit.


Little did I know until I was in the midst of things that I was actually incorporating a few of the Practice Standards.  (Imagine what I could accomplish if I used them with intentionality.  Oh my.)   

Practice Standard 5: Use appropriate tools strategically.

I can't help but think that some of the dots are connected more securely for these mathematicians after strategically seeing and using the number line tool in a different context from what they're accustomed to.  

Practice Standard 7:  Look for and make use of structure.

They're also being exposed to the patterns that repeat themselves and hold various mathematical concepts together.  Math concepts should be integrated, not isolated.  I can honestly say I'm not nearly intentional about solidifying those connections as I could be, but this year's Aha! moment is helping.

I keep thinking that one of these years I'll have this math thing down.  I'm pretty sure I'm missing the mark in a myriad of ways, but I'm holding on to the idea that I'm moving in the right direction.  There's hope.

Pin It!

Monday, March 16, 2015

Measurement Misconceptions (Freebie)

Studies show that even up into middle school, measurement misconceptions are rampant.  For years I thought my kids understood how to use rulers.  It wasn't until the past three or four years that I discovered the misconceptions.  They're easily hidden unless we dig a little deeper.

I've been working on fixing the issue.  I've shared some strategies I'm trying on previous posts.  Read about one of those strategies here.  After you do, what I'm sharing below will make more sense.

Here are some additional opportunities for kids to practice measuring when the object is not lined up at zero.  What if we move the zero to another spot on the ruler?  Can they still measure that object?  If so, they understand how a ruler and units work.


Pin It!

Monday, March 24, 2014

Agree or Disagree? (freebie)

My mathematicians recently measured and worked with place value at the same time.  I have Math Their Way to thank for this activity, so I receive no credit except that I fancied up the sheet you'll see soon.

I designated several things in the room that I wanted measured with unifix cubes.  All the objects were varying lengths but longer than ten cubes.  Partners visited a spot, measured the object with cubes, broke their long train into tens and ones, and placed them on a place value board.  


At each station they recorded their results on an Agree or Disagree sheet.  The first pair to visit simply wrote their answer in the box at the top.  Everyone else who came after them, did their own measuring and then wrote their names in the correct column based on whether they agreed or disagreed.  If they disagreed, they had to write the answer they got by their name.

I've used the recording sheet for all kinds of math concepts. It's rather versatile.  Feel free to use it as well.  Just click on the graphic below.


Pin It!

Wednesday, February 12, 2014

Measurement Book

Young mathematicians fool us into thinking they know how to use a ruler.  I've seen a study that proves this is true.  Shown a ruler and object like the one below and most students, even into the upper elementary grades, will give a wrong answer.  Their understanding of measuring units is faulty.
This is why a year ago I started attacking this misconception and posted about it here (freebie included) and here.  This year we tried the same activities, but I decided to make a class book out of the concept.  We need all the additional practice we can get!


Pin It!

Monday, May 27, 2013

Big Foot Meets 1st Grade (freebie)

My mathematicians spent time this year measuring up one side of my classroom and down the other...literally.  I love the following idea that I borrowed from Van de Walle.  The kids used large footprints to measure my class from one wall to the other.  It's a great way to work on no gaps and overlaps while using units, as well as the importance of choosing the right unit for the job.  


The kids also used the following sheet for the task.  The first group of students wrote their measurement in the top box.  All other groups after them would measure the room and then either sign their names in the agree column or sign the disagree column along with the measurement they got.


(Click the picture for your own copy.)

I borrowed this sheet from Math Their Way and spruced it up a bit.  I've used it for all types of math activities, from place value to counting to measurement to addition or subtraction (and much much more).  Feel free to get yourself a copy and let me know how you end up using it too!

Pin It!

Monday, May 6, 2013

Math in a Classroom Book

We're nearing the end of the year, yet my kids still love reading our classroom books.  We just made a new one to go along with all the measuring we've been doing lately.


First we made clocks from this Pinterest idea I found that you can see above.  They're made out of toilet paper or paper towel rolls with a slit that I cut so they'd fit around their wrists.  Then I walked the kids through the process of drawing the clock face.  (I assigned them times to the hour and half hour.)  Then they traveled the room, asking others what time it was according to their watch, and wrote down times on the sheet below.


At the same time, I took pictures of all the kids' watches so I could make this book.


Math and classroom books do indeed go hand in hand.  My plan is to find more ways to integrate the two! 


Pin It!

Wednesday, May 1, 2013

Numberless Clocks (freebie)

My blog and I are still in measurement mode, specifically telling time.  I believe my kids understand it better than any group I've had.  (Their teacher is getting smarter...finally.)  I give all credit to an article I read.  It spells out four engaging lessons that I'd highly recommend.  Go here to get your own copy.  I especially love how it stresses teaching the hour hand separate from the minute hand.  This post is a glimpse into what it was like to teach the minute hand.  (To get all the details, check out the whole lesson in the article.)

One of the things the lesson recommends is using a numberless clock like the one below.  Click on the picture to get your own copy. 

First I drew the minute hand directly pointing to a 5-minute mark.  "How many minutes past the hour is it?"  We practiced with a few of those easier ones before I started pointing the minute hand to one of the smaller lines, which of course is a more difficult concept.  

I got pretty lucky too, because MyBinding.com graciously sent me some dry erase pockets, which came in mighty handy for practicing this skill.


I inserted two of my numberless clocks, back-to-back, in each pocket and used a dry-erase marker to draw the minute hand.


Each group got their own dry erase pocket.  As one child held the pocket, the others wrote the number of minutes it was showing.  The child would pass it, turn it around to the other side, and everyone would count and write the minutes again.  When they had completed both sides of their pocket, I could quickly erase and draw new hands.  Pretty slick! 


Like I said, this was merely a glimpse into the lesson.  I left out lots of good parts.  You should really check out the article.  You also should check out MyBinding.com and their dry erase pockets.  They saved me copies and time, and no doubt they can be used numerous other ways as well!


Pin It!

Monday, April 29, 2013

Telling Time With Cubes

I'm teaching time in a new and adventurous way this year.  This particular lesson all started with cubes.  I would have never thought cubes could lead to a better understanding of time, but stick with me and you'll see that it makes complete sense.  Each child had their own train of five.


After counting every child's set of 5 cubes, I traded them for a paper copy of five cubes which we then taped to a poster.  We labeled the number of cubes on the top and the number of trains on the bottom.  (I would have gladly used my whiteboard for simplicity sake, but my Smart board was totally in the way.)


Once we noticed several things about this interesting number line, we removed all the cubes past the 12th train and formed them into a circle like you see below.


Well, what do you know?  Looks an awful lot like a clock, eh? Of course, there was much discussion going on throughout this lesson.  I left out lots of information.  I just wanted to give you a gist of how it went and wet your appetite.  If you're interested in reading about the complete lesson, check out this post where you can find a link to an article that explains it in full.  It's good stuff!

Pin It!

Wednesday, April 24, 2013

Slit Clocks?

I think after 19 years of teaching, I might be on the verge of possibly figuring out how to teach time.  The short article below got me on the right track.  It spells out four lessons in such a fabulously concrete and sequential manner.  It makes a lot of sense.  You should definitely read it.  (Click on the picture for your own copy.)  


I love how the article suggests introducing the clock with the hour hand only.  It's a brilliant idea.  Lesson two shows how to use slit clocks for this purpose, which I had never heard of before.  Here are a few pictures of how to make one.

 Draw the numbers of a clock on a paper plate.  Then cut a slit at the 12.

 Cut out a circle.  Draw the hour hand like so and cut a slit as well.

 Slide the small circle through the slit on the paper clock.  Move the small circle from the back and hold the clock with the other hand.

In this lesson, the kids picked up very quickly that if the hour hand is pointing directly to a number, like the 6 for example, it's 6:00.  When the hand is just beyond the 6, they learned to say, "a little past 6:00."  If the hand is almost to the 6, they say, "a little before 6:00."  

The kids had lots of opportunities to practice with partners, both showing times and reading times.  They practiced directly on the hour, and they had a chance to be tricky as well by moving their hour hand a little before or after a number.


Go grab that article.  You'll be glad you did.  I sure am!


Pin It!

Monday, April 22, 2013

ROY G BIV Measurement

It's sweet when art and math collide.  If you consistently read my blog, you've noticed a plethora of measurement posts of late.  That's because we've been in the midst of measuring.  Over a week ago we put our measurement skills to the test when we used them to create these 3D rainbows.


I found the rainbows on Pinterest, but the link didn't lead me to any directions.  Here's how I made them.  Each child got 12" strips of paper in each color of the rainbow.  We then measured and cut them to match these numbers.


Talk about lots of practice measuring!  I also got to talk about the idea of ROY G BIV, which helped each child put their strips in the right order.  After they got their strips ordered and the ends all lined up, I came around stapled the lined up end for them.  That left the other ends nowhere near lined up, but there's always one in the crowd who can figure out how to pull them all together and line them up anyway.  Once I got that person's second set of ends stapled, they became available to help those who just didn't get it.  In the end, they are colorful representations of how much these kids have learned about measurement!


If you're wondering what the writing on the strips is all about, we labeled each one. 
r = 12 in.
o = 11 in.
and so on


Pin It!